 |
|
|
|
 |
|
|
|
|
|
|
|
|
|
|
|
|
|
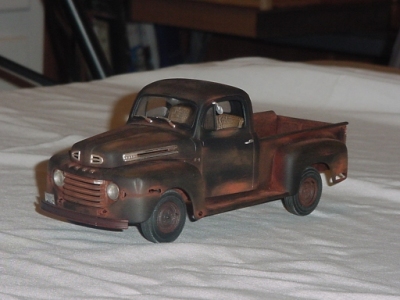
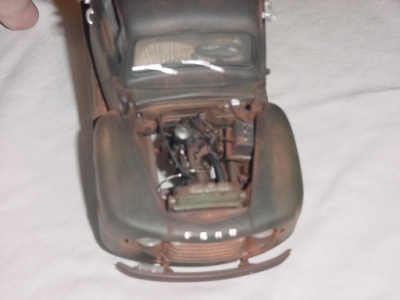
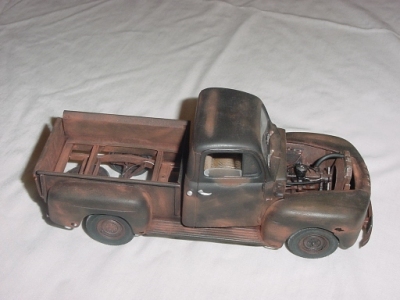
Building a Ford flathead Six
By:Todd McWilliams
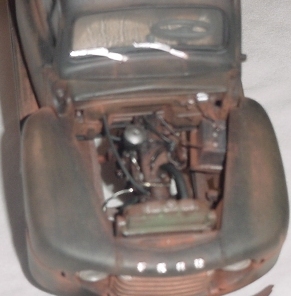 |  |
I built this engine to go into a '50 Ford P/U truck I built. The pictures were taken by a friend. I'm sorry, but I don't have a camera to give you close-ups of the engine. I tried to write this in simplified form and easy to understand. The '50 Ford truck is a replica of an actual '50 Ford truck in storage at a "Public Storage" unit on the North side of Milwaukee, WI. All the rust, dents, dings are on the 1:1 vehicle, even the rusted out bed. If at all possible, locate or purchase "Collectible Automobile" Vol. 4, No. 5 (February 1988). It's still available from CA. Call 1-800-871-2022. $6.95 + $1.50. This issue has great reference on the Ford flat six motor. This is what I did to convert the AMT '41 Plymouth flathead 6. After gluing the Plymouth engine halves together, I carefully cut the tranny off the Plymouth engine block, being careful not to injure the block's tail end. I filed the ends of the block and flat sanded it smooth. Next, after gluing the Ford engine halves together, I carefully cut the Ford block off the tranny, being carefull not to injure the bellhousing. Note: You'll lose the Plymouth tranny and the Ford engine here during the cutting. File the tranny and sand smooth. At this point you'll need to fill in the "holes" in the bellhousing facing the engine area. I used small cut flat styrene sheet cut to size. (Small pieces too!!) I used gap filling superglue to fill any small gaps or holes. Dry time is about at least 2 hours, unless you use an accelerator on the superglue. That's something I need to buy too. I then sanded this face smooth when all was dry. The Plymouth engine and the Ford tranny faces should fit smoothly together. Alignment is another thing! Basically I visually lined up where the crankshaft would exit the engine to the tranny and line this up with center of the spline imput shaft ,coming out of the front of the tranny, to the crank end. I don't know about you, but it helped me with knowing a bit about cars and engines. I then cut off the "lump" on the side of the Plymouth engine. Believe it or not, the Plymouth engine's head, placement of the sparkplugs, intake/exhaust manifold/carb and air cleaner are almost a dead ringer for the Ford. I'm serious!! They are that close, so I didn't mess with any of that. Even the placement for the top radiator hose inlet on the manifold was pretty much there!! When aligning the block to the tranny, from side to side (right to left) use the mold marks on the block and the tranny for this. It works good as a visual aid. Now from top to bottom, I left about 1/16 of an inch between the top of the bellhousing and the top of the block, below the bottom of the head. Before I glued the two together, I held the two together, (it's a little rough to do, a rubberband may help) and placed the two in the engine bay with the firewall in place. This is to make sure everything is ok and going to fit in place and enough clearance. Better to do this now then to find out later you needed to adjust something!!! When (I use Testor's liquid glue most of the time, because it "flows" into all areas when applied.) you are ready to glue the two together do it visually, you'll have a couple of minutes to adjust the two. Set aside and let dry/cure overnight. If you don't have reference photo's, get them. It sure beats running back and forth trying to remember what went where!! I scratch built (plus parts box and Evergreen Plastic shapes) the oil filter, oil filler, dipstick (out of .015 piano wire) coil, starter (I don't remember which kit I got the starter from), fuel pump, engine mounts. On the placement in the '50 Ford P/U, you may want to keep the "Wings" (motormounts on the Plymouth's kit motor) till you find out just how it will sit in the engine bay. I used the fan blade and pulley from the Plymouth kit. Not too sure about the generator. I had to modify the water pump where the bottom radiator hose connects to the pump. I just added a scale size diameter piece of round stock or sprue to the waterpump. When all was said and done I added plug wires, heater hoses, radiator hoses, fuel lines, coil wires, generator/starter wires, battery wires, brake lines. Before I wired and plumbed it, I painted the finished assembled block and once dry applied a black stain to replicate oil leaks, drips and basically crud (BLAH) on the engine. I rusted it, weathered it, ragged it and so on. I'm not one to pat myself on the back, but it turned out right on the money with the photo's I took. Enjoy!! - Todd
 |  |
 |  |